NETWORKSTIP Networking CCNA,Centos,Ubuntu,Sql,

Made By Muhammad Nafees

Breaking

Thursday 17 March 2016

March 17, 2016

Installing and enabling IIS and FTP on Windows Server 2008 R2

Installing and enabling IIS and FTP on Windows Server 2008 R2

  • Open Server Manager, go to Roles and click “Add Roles”
  • In the Add Role Wizard, select Web Server (IIS) role to install

  • Click Next until you reach Select Role Services page, leave the default and check FTP Server, FTP Service and FTP Extensibility at the bottom. Click Next, follow the wizard and finish the role installation.
  • Now open IIS Manager from Start > Administrative Tools, expand the server, right click Sites, and click Add FTP Site, give it a site name and configure the physical path as needed.
  • Configure Binding and SSL. In our case, we’d like to bind to all unassigned IP addresses and do not use SSL.

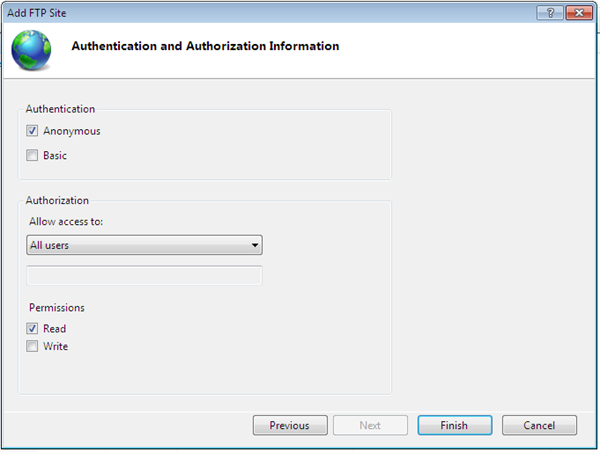
  • Enable Basic Authentication and configure authorization. In our case I’ll start with allowing All users both Read and Write permission as long as all users on the server are password protected.
  • Click Finish to finish the configuration.
March 17, 2016

How to add FTP or configure FTP site in window Server 2008 R2

How to add FTP or configure FTP site in window Server 2008 R2


Step  4
Open IIS Manager. Under connections, right click on sites and click Add FTP Site as shown in the screenshot.

Step 5
Write a name for your FTP site and select the path of folder you want to share.
Step 6
Select the default IP address and select No SSL from SSL options.
Step 7
I used these authentication settings shown in the screenshot, you can choose at will.

Click finish and you are done. You can now access this local FTP server from any other node of your local network. In my case the URL for the FTP is ftp://127.0.0.1 or use ftp://localhost or use ftp://yourpcip

Note: some time ftp show an error of authentication like wrong user name password special in when configure FTP on IP cameras for uploading snaps services in this case just follow this step


  • Allow FTP Specific User Only
After configuring FTP site click basic settings


then click connect as 

Enter user name and password then ok finally Test settings to confirm all is working fine 


March 17, 2016

How to Setup a Local FTP Server in Windows 7

How to Setup a Local FTP Server in Windows 7

  • In Windows 7, you can share files on home network easily using Home Group but creating an FTP server gives you many benefits. The FTP can also be accessed by other Operating Systems in the network, You can also configure it to be accessed from anywhere through internet. In this short tutorial, I will guide you to make an FTP Server on Windows 7 for LAN.  
  • If your IIS is already installed then start from step 4.

Step 1
Open control panel  and then click on Programs.
Step 2
In Programs, click on Turn Windows features on or off.
Step 3
After clicking Turn Windows features on or off you will see a new window. Find Internet information Services and mark check on it and then click OK button.

Step  4
Open IIS Manager. Under connections, right click on sites and click Add FTP Site as shown in the screenshot.

Step 5
Write a name for your FTP site and select the path of folder you want to share.
Step 6
Select the default IP address and select No SSL from SSL options.
Step 7
I used these authentication settings shown in the screenshot, you can choose at will.

Click finish and you are done. You can now access this local FTP server from any other node of your local network. In my case the URL for the FTP is ftp://127.0.0.1 or use ftp://localhost or use ftp://yourpcip
March 17, 2016

Set Hostname on CentOS

Set Hostname on CentOS

  1. how to check host name in centos
  2. open terminal type command hostame hit enter 
  1. TO change host name type hostname example.local in my case nafees.local

Next Step : Edit /etc/sysconfig/network

This file also contains your hostname. Open the /etc/sysconfig/network file with your favorite text editor.


Friday 11 March 2016

March 11, 2016

Configuring RADIUS Authentication for L2TP

Modifying the RRAS Network Policy

  • After installing and configuring RRAS, the NPS system will deny access by default to the RRAS server for clients, unless the network policy generated is modified. 

  • The network policy, which is labeled Connections to Microsoft Routing and Remote Access server, can be found under the Network Policies node of the Network Policy Server.

  • The policy must be set to Grant Access in the Access Permission section of the dialog box, as shown in Figure 5. This dialog box can be invoked by right-clicking the policy and choosing Properties. After enabling, the NPS system will allow client connections.

 Modifying the RRAS network policy on the NPS server.
Configure Network Policy:
It is import to apply the network policies to control the access. In this demo I will explain how to make custom network policy on the NPS.
1.    To open NPS mmc go to start > administrative tools > Network policy server
2.    In the mmc expand the “Policies”, click on “Network Policies” and then click Connection Microsoft Routing and Remote Access Server.
3.    Check Gract Access and then change Type of network access server "Rmote Access Server"

4.   On the specify condition page, click add on the select condition dialog box, scroll down and double click on tunnel type.

5.    In tunnel type dialog box type L2TP click ok .

March 11, 2016

How to Setup a VPN Server in Windows Server 2008 R2

How to Setup a VPN Server in Windows Server 2008 R2

Open “Server Manager“.

On the top menu, click on “Action” and “Add Roles“.


This will bring up the role installation wizard. On the first screen titled “Before your begin” read the requirements and click “Next” to continue.

Next, on the screen titled “Select Server Roles“, place check mark on “Network Policy and Access Services” and click “Next” to continue.


On the third screen titled “Network Policy and Access Services” read what it is stated and click “Next” to continue.

On the following screen titled “Select Role Services” place a check mark on “Routing and Remote Access Services” and make sure “Remote Access Service” and “Routing” are selected as well. Click “Next” to continue”.


Next, on the screen titled “Confirm Installation Selection“, you will get a summary of everything that will be installed. Make sure everything looks good and click on the “Install” button. Once the installation finishes, click “Close” to end the wizard.

Back on the main Server Manager window, right click on “Configure and Enable Routing and Remote Access“.


This will bring up the “Routing and Remote Access Wizard“. On the first window, click “Next“.

On the second window, select “Custom Configuration” and click “Next” to continue.


Proceed by pressing the introductory text over the Next and you arrive at the menu where you should select the type of configuration, RRAS. Select Custom configuration and click Next .


Select the window the following options: VPN access, NAT and Lan Routing and proceed by pressing Next .


Accept on the last page, press the Finnish press that appears, and then restart the service window of the Start service .


Open the RRAS: sin menu, select the IPv4 option and enter from the NAT, on which the right-click pop-up menu, select New Interface 

Click on local area connection 


From the drop-down menu on an intranet network and press OK . Select the window that opens, setting Private interface , and then click OK .


Now do the same thing again, but select the external network adapter, and then click the settings window Public interface and tick the same box Enable NAT on this interface .


Now, the NAT network should look like this. I have named my network cards under the names for reasons of clarity Inside and Outside , so do not worry about them.


Now click on the RRAS at the top right of the server, and then click Properties .

Tick ​​the Security tab, select Allow custom IPsec policy for L2TP connection , and then type in the desired PreShared Key. I use a key example london2011 .


After accepting the settings, ask the RRAS that you turn it on again. To accept the declaration OK .


Right click on the RRAS in off the server, select All Tasks, and Restart to start the service again. The server is configured to half its value.


Create AD of the user who is given access for login. Change the user's Dial-in tab, clickNetwork Access Permission value of Allow access .

Wednesday 9 March 2016

March 09, 2016

error message when you try to start Windows Firewall “0x8007042c”

“0x8007042c” error message when you try to start Windows Firewall


When you try to start Windows Firewall, you receive the following error if the Firewall service is disabled or if your computer is infected with malware:

If you still receive error 0x8007042c when you try to turn on Windows Firewall, go to Method 2

Method 1: Troubleshoot Windows Firewall problems automatically

To fix this problem automatically, click the Fix-It image below. If a security notification appears, click Run.

If you still receive error 0x8007042c when you try to turn on Windows Firewall, go to Method 3

Method 3: Start Windows Firewall manually

You can start the Windows Firewall services manually and make sure that they start automatically in the future. To do this, follow these steps:
  1. Click Start , and then type Services in the Search box.
  2. Right-click Services. and then click Run as administrator. If you are prompted, enter your administrator user name and password, and then press Enter.
  3. Scroll until you see Windows Firewall, and then double-click Windows Firewall.


Click the Startup type box,and then click Automatic.

  1. If Service status is Stopped, click Start.
  2. Click Apply, and then click OK.
  3. Scroll until you see Base Filtering Engine, and then double-click Base Filtering Engine.
  4. If Service status is Stopped, click Start.


  1. Click Apply, and then click OK.
  2. Restart Windows and confirm whether Windows Firewall is enabled.
If you still receive error 0x8007042c when you try to turn on Windows Firewall, go to Method 4

Method 2: Start associate services

To stop and then restart these services by using a batch file, follow these steps:
  1. Click Start, type Notepad in the Search box and then click Notepad in the programs list.
  2. Select the following text, right click the selected text, and then click Copy. Right-click anywhere in the Notepad window, and then click Paste.
    sc config MpsSvc start= auto
    sc config KeyIso start= auto
    sc config BFE start= auto
    sc config FwcAgent start= auto
    net stop MpsSvc 
    net start MpsSvc 
    net stop KeyIso 
    net start KeyIso
    net start Wlansvc
    net start dot3svc
    net start EapHostnet 
    net stop BFE 
    net start BFE
    net start PolicyAgent
    net start MpsSvc
    net start IKEEXT
    net start DcaSvcnet 
    net stop FwcAgent 
    net start FwcAgent
  3. In Notepad, Click File, click Save As, and then type Repair.bat in the File name box
  4. Click the Save as type box, and then click All Files (*.*).
  5. In the left pane, click Desktop, and then click Save.


  1. On the File menu, click Exit.
  2. On your desktop, right-click the Repair.bat file that you saved in step 5, and then click Run as administrator.

    Important If you are prompted for confirmation to stop a service, press Y on the keyboard, and then press Enter.
  3. Try to start Windows Firewall again. If you can start Windows Firewall, delete the Repair.bat file. To do this, right-clickRepair.bat, click Delete, and then click Yes.

Sunday 6 March 2016

March 06, 2016

How to Host JavaScript or CSS Files on Google Drive

How to Host JavaScript or CSS Files on Google Drive

1. Many bloggers use a custom template for their blog and a custom template sometimes requires an external JavaScript file, but sadly we can't host the JavaScript or CSS file on Blogger because Blogger only allows us to upload images and videos. 

2. Actually it is not so hard to use Google Drive, just create a folder, upload the JavaScript file (or any other file like images, videos, documents including PDFs and Microsoft Office files) and then change the file's sharing settings from "private" to "public on the web", or simply change the folder's sharing settings from "private" to "public on the web" and all files inside that folder will have the same sharing permissions, but the tricky part is getting the proper direct link for the JavaScript or CSS files, so we can use it on the blogger template. Please follow the steps below to host your JavaScript or CSS file using Google Drive:

Method 1
With this method you can get the proper link with the file name:
https://googledrive.com/host/folder-id/filename

Example:
https://googledrive.com/host/0B47Pdqj--olfUENkNGhtX3lSN0U/example.js
https://googledrive.com/host/0B47Pdqj--olfUENkNGhtX3lSN0U/example.css

How to add an external JavaScript to a web page (blogger template)?
<script type='text/javascript' src='https://googledrive.com/host/folder-id/filename.js'></script>

How to add an external CSS to a web page (blogger template)?

<link href='https://googledrive.com/host/folder-id/filename.css' rel='stylesheet' type='text/css'>

Step 1:
Login to your Google Drive account > Click Create > Select Folder


Step 2:
Type a name for the folder and click Create button


Step 3:
Select the folder and then click the Share button

Step 4:
Click Change...

Step 5:
Change the sharing settings from "Private" to "Public on the web" > Click Save > Click Done


Step 6:
Now click on the folder's name to go into it
Step 7:
Click the Upload button > Select Files...
Step 8:
Select file > Click Open
Step 9:
The item will have the same sharing permissions as the selected folder.... Click Upload and share

Step 10:
Copy the string characters after #folders/
Step 11:
Open a new browser tab > paste that string (folder id) into the address bar after
https://googledrive.com/host/ 
Example: https://googledrive.com/host/0B47Pdqj--olfUENkNGhtX3lSN0U

Step 12:
To get the direct link to the file, right click on example.js > Select Copy Link Location (Firefox)

Method 2


Copy the link > paste in Notepad

Example:  
https://docs.google.com/file/d/0B47Pdqj--olfVVg3MFgxVlpqd0k/edit?usp=sharing
File ID: 0B47Pdqj--olfVVg3MFgxVlpqd0k

Paste the file id after: https://googledrive.com/host/ 

Direct link to the file:
https://googledrive.com/host/0B47Pdqj--olfcUNkV3o3SjdoVGM