NETWORKSTIP Networking CCNA,Centos,Ubuntu,Sql,

Made By Muhammad Nafees

Breaking

Thursday 20 October 2016

October 20, 2016

How to Change Hostname and ip in RHEL / CentOS 7.0

How to Change Hostname in RHEL / CentOS 7.0

You have probably needed to change the hostname of your CentOS 7 install for one reason or the other. Changing the hostname in CentOS 7 is now much simpler than ever.
If you are ready open up your terminal and follow through this tutorial, and in less than 10 minutes you will have changed your hostname!

Check Hostname

To check the hostname open your terminal and type the following command:
  • $ hostname
By default the hostname is localhost.localdomain. To change this you can follow the following steps

Edit /etc/hostname File

The easiest way to change the hostname is to edit the /etc/hostname file. Open your terminal and with your favourite text editor delete localhost.localdomain and change to whatever name you like.
  • $ sudo vi /etc/hostname
Save changes and then confirm your hostname by using hostname command. If it has not changed then you need to restart the CentOS 7 server.

Using Hostnamectl

Hostnamectl is a tool that is used control the Linux system hostname. You can also use this tool to change the hostname in a few easy steps.
First and foremost confirm the hostname by using hostnamectl as follows:
  • $ hostnamectl status

 To change the hostname type the command:
  • $ hostnamectl set-hostname grace

 It may be necessary to restart the systemd-hostnamed daemon so that as to reflect the change in Static hostname.
  • $ sudo systemctl restart systemd-hostnamed


Note: Hostnamectl recognizes three types of hostnames: prettystatic and transient. Pretty is stored in/etc/machine-info and is a human readable format while static hostname is stored in /etc/hostname. Transient hostname is more of a temporary hostname which may take up the static hostname when network connectivity is lost.

Using Nmtui

To change the hostname you can also use the NetworkManager text interface tool (nmtui). This is also another very easy method and fairly straight forward.
From the command line invoke nmtui:
  • $ sudo nmtui
This will present to you a text user interface like this. Using the arrow keys select Set system hostname and use tab to select OK.
Edit the hostname which by default is localhost.localdomain and change it to whatever you prefer.
After changing the hostname, choose okay, then the following confirmation message will appear. If the hostname is as you desire you can choose OK. You can confirm changes using the hostname command. 

Using Nmcli

Nmcli is a command line tool for controlling the NetworkManager and can also be used to change the hostname.
To check the hostname with nmcli, type in your terminal:
  • $ nmcli general hostname
This will print out the hostname to your terminal. By default in CentOS 7 it should be localhost.localdomain.
To change this use the command:
  • $ nmcli general hostname grace
This will request for your password via a GUI interface. If you are running this command remotely remember to use root or sudo:
  • $ sudo nmcli general hostname grace
You can then check the hostname with the command hostname or nmcli general hostname.

Wednesday 19 October 2016

October 19, 2016

How to Set Up a Captive Portal Using pfSense

How to Set Up a Captive Portal Using pfSense

PfSense provides an easy way to set up a captive portal for your network. Using the portal allows you to direct the users on your network to a specific web page before they are allowed to access the internet. The web page can be a simple page with instructions and terms of use, or a page that requires a username and password for authentication.
Captive portals are most commonly used for wireless hotspots. If you've ever used the wireless network at a hotel or airport then you have most likely clicked through a portal before you were able to go online. They can also be used on wired connections for business centers, internet Cafés, or your home!
Once the portal has been enabled any computer that points to the pfSense router as the gateway will be automatically redirected to the portal landing page.

Basic Portal Without Authentication

First I'm going to show you how to set up a basic portal without any authentication. Clients connecting to the network will be redirected to an HTML page of your choice. This page can display any message or image that you wish. They must click through the portal by clicking the continue button before they will be granted access to the network.
1. Enable the captive portal - To enable the portal click on captive portal which is found in the services menu of pfSense. Select the check box "Enable captive portal"
2. Select the interface - Most users will select the LAN interface. The captive portal can only run on one interface at a time and pfSense is not able to act as a reverse portal.

Enable the captive portal and select the interface it will run on.
3. Upload a portal page - You must upload an HTML/PHP file to use as a landing page for clients connecting to the portal.
In the section called "Portal page contents" click the "Choose File" button and select the HTML page you want to use. When you are finished click the save button at the bottom of the page to apply the changes.
To verify that your HTML file was successfully uploaded click on the "view current page" button directly below the HTML file upload box.
                                                             Upload an HTML file to serve as the portal page.


4. Testing the Basic Portal - To make sure everything is working simply try to access a webpage from a computer on the network.
If everything is functioning correctly the browser will be redirected to the landing page. Once you click continue the browser should continue to the originally requested URL.
Troubleshooting Tips
  • If the portal page does not load verify the HTML file was uploaded correctly.
  • If the captive portal is running on a VLAN interface make sure the parent VLAN is not assigned to another interface.

                                                                                                                                                                      If the captive portal is working users should be directed to the landing page when they first connect to the internet.

Using Authentication

Another popular reason for using captive portals is to provide a system for authenticating users before they are granted access to the internet.
Users that do not have a valid username and password will not be granted access to the network.
When authentication is enabled users must enter a username and password to access the network.
Local Database vs Radius
The simplest way to set up authentication is to use the local user database on pfSense. If you have a lot of users to manage I would recommend using radius authentication since it is much more flexible.
You can configure the captive portal to point to a remote radius server or you could install the FreeRadius package directly on pfSense. Radius integrates well with existing authentication systems such as active directory, etc.
Initial Setup
To get started follow the steps in the previous section above to enable the captive portal and select an interface.
Modifying the HTML
In order for this to work you will need to use a slightly different HTML landing page that has username and password fields. You can check out my sample HTML page and modify it to suit your needs. Follow the instructions in step 4 of the previous section to upload the page.
For these examples I'm demonstrating pretty basic landing pages but I'll show you how to customize them later.
Enabling Authentication
To enable authentication select either local or radius authentication on the main captive portal settings page. Click on the save button to activate the changes.
Select either local or RADIUS as an authentication type.

Creating Local Users

If you selected local user manager as your method of authentication then you'll need to create some users. If you plan on setting up a large amount of users I would recommend using radius, LDAP, or active directory instead of the local database.
If you don't expect to set up many accounts then this option works well because it's so simple. In some cases you might want to let users share a common username and password, and that's a perfectly valid option too.
To create users in pfSense open the user manager which is found under the system menu. Then simply click on the plus symbol to create a new user.
The pfSense user manager can be used to create local accounts for the captive portal.

Configuring the User Account

To create a simple user you only need to enter a username and password. There are a few other useful options worth checking out though.
Expiration Date - This option allows you to define a date that the account will automatically expire. So if you know the account is temporary this will save you the trouble of having to manually disable the account. If you leave this field blank the account will always be active.
Group Membership - Groups are handy for organizing your users. Groups can be assigned access to administrate certain parts of the pfSense web GUI. For the purposes of the portal groups really aren't that useful.
                   Setting up users is pretty straight forward. You need a username and a password, that's 

Customizing the Portal Page

If you want to make the portal landing page look a bit nicer you can add your own images and custom PHP code.
To upload an image click on the file manager tab in the captive portal settings. In order for files to be used by the portal they must have a prefix of "captiveportal-" in the filename.
You can then reference the files using standard HTML image tags. To see an example download the HTML page with an image link I created.
                      The portal landing page can be customized with images and PHP.

Other settings and Performance Hints

On the main captive portal page there are a number of other settings you can adjust to customize how the portal functions. Below are the descriptions for some of the settings I think are useful.
Idle timeout - If a user is idle for a certain number of minutes they will be automatically disconnected. I recommend setting an idle timeout to keep resources from getting tied up on your pfSense system. You don't want to set the timeout to be too low or your users will be frustrated, even setting it to something like 8 hours will help.
Redirection URL - By default users will continue to the web page they originally requested after passing through the portal. This setting allows you to force clients to be directed to a page of your choice after connecting. Users can then enter a new URL and browse the web normally.
Concurrent user logins - Enabling this setting will allow only one connection to the portal per user. This will prevent users from making multiple connections using the same username and password.

Configure Captive Portal Group settings 
  • Go to the User Manager by navigating to System -> User Manager in the top menu


  • Click on the Group tab to switch to the overview with groups
  • Click on the + icon to create a new group
  • Fill in any name you would like to assign to this group at Group name and click Save at the button to create the new group.

  • After hitting save, you will return to the Group manager page where you should now see your group having been added. Click on the E icon right of the row with your new group to edit the newly created group.
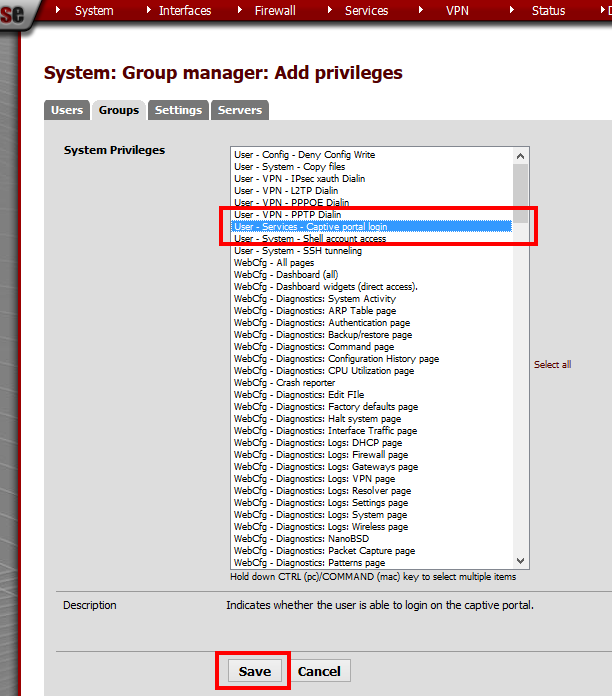
  • You will now notice an extra option is available, compared to seeing this similar screen at step 4 when creating the group, namely Assigned Priviledges. Click on the + icon in this section.
  • In the list with priviledges, select the row stating User - Services - Captive portal login. If this row is not in the list, you most likely haven't enabled the captive portal yet. You need to do this before you can assign rights for it to a group. Hit save at the bottom to add the priviledge to this group
  • You will now see the rights to log in to the captive portal have been added to this group. With the Group Memberships section on this page you can add or remove users to/from this group. Users in this group will be able to log on through the captive portal using their credentials.

Tuesday 18 October 2016

October 18, 2016

How To Fix Video Conversion Problem

How To Fix Video Conversion Problem
This topic has been discussed many times so i am going to write a complete guide to track your video conversion problem and fix it. I am using ClipBucket 2.0.9, if you have not already update to latest version, please download it from http://clip-bucket.com/latest
Adding some of my Forum post content, here is what we are going to track our problem.
1.    Folder permission checking
2.    Uploading & Conversion Settings
3.    Server Modules Settings
4.    Testing file upload Part 1
5.    Testing file upload Part 2
Folder Permission checking
·        Check all directories in “files” folder are chmod (permission) to 777
·        Check there is not PHP error on any of your page
·        Check user login
·        Check Browsing issue
please fix all the above issues before going to next step
Uploading & Conversion Settings
Goto Admin Area > Website Settings & Configurations > Upload & Conversion Settings
·        First make sure your FFMPEG, PHP and Flvtool2 Path is correct
·        Mp4Box incase you want to get videos output in Mp4 Format (HQ only)
·        If your FFMPEG version is greater than 20000, it may requires VF option on, we will try with “Use Vf On”
·        Turn of “use crons” so we can convert videos directly
Server Modules Check
Goto Admin Area > Tool Box > Server Modules
·        Make Sure all statuses are green ( a check sign)
·        if something showing (ALERT) sign, go back to step 2, change settings according to your host
·        FFMPEG version should be greater than 19000
·        FLVtool2 1.6 or greater
·        Ask your host for weather they support PHP CLI or not, 90% host support it by default
Testing File Upload Part 1
now we are going to upload a small file, less than 2MB you can search for “Bill Gates Pie WMV” or something good for testing purpose only
1.    Goto Upload (Front End)
2.    Fill the details and upload file and wait till you are redirected to Success Page
3.    Now open up Facebook, login to your account, check your inbox and new updates, logout, close facebook
4.    Goto Admin Area > Video Manager
5.    Now you have one of three status “Successfull” , “Processing” , “Failed”
Successfull
if your status is succcessful, move to next part. Congratualation for passing this phase 
Failed
Open “File Conversion Log” and check whey FFMPEG is not conversion videos, there could be one of following problems
1.    unrecognized option ‘-vf’
Turn off “use vf” in upload & conversion settings under FFMPEG PATH field
2.    option ‘padcolor’ has been removed, use the pad filter instead
Turn on “use vf” in upload & conversion settings under FFMPEG PATH field
3.    Check for any ‘libmp3lame’ or ‘libx264′ or any codec error
Ask your host to re compile your FFMPEG with required codecs
Processing
Now, the most difficult part..fasten your seat belts.
1.    Goto Admin Area > Tool Box > Conversqion queue
2.    Check if processing is started or not, if not, then your PHP Path is wrong or your PHP Does not support CLI or your register_argc_argv is not enabled
3.    Fix these problems and then start again from Part 4
4.

it will take some time depending on your server speed and file size and video duration and after few minute refresh page 

Testing file upload Part 2
1.    Now upload 10 MB video
2.    Wait for uploading & Success Page
3.    Now open Youtube, search for new movies trailers, watch it (in HD) , once finished, get back to ClipBucket admin panel
4.    check , what is file status, if failed, follow instructions above, if success, carry on with your ClipBucket but
5.    if Processing , check weather file is uploaded in /files/temp folder
Well, thats it for now, i will write more instructions “if required” later…


Monday 17 October 2016

October 17, 2016

Clipbucket website configuration settings

Clipbucket Website Configuration settings

These settings should be same as it is shown in snap 

Some time path could be changed example FFMEG path  /usr/local/bin/ffmpeg or /usr/bin/ffmpeg
same for MP4BOX and for others.


some time libfaac instead of libfdk_aac in admin section for video codec.


Server video conversation Modules &Tools all should be green.


PHP Server Configuration Info.
October 17, 2016

Enabling Apache service on boot in CentOS 7

Enabling Apache service on boot in CentOS 7

Check if the service starts on boot

$ systemctl status httpd
httpd.service - The Apache HTTP Server
   Loaded: loaded (/usr/lib/systemd/system/httpd.service; enabled)
...
The last word, either enabled or disabled, will tell you if the service starts on boot. In the case above, the Apache2 webserver "httpd", it's Enabled.
October 17, 2016

How To Fix “Can’t connect to local MySQL server through socket ‘/var/lib/mysql/mysql.sock’ (2)” Error?

How To Fix “Can’t connect to local MySQL server through socket ‘/var/lib/mysql/mysql.sock’ (2)” Error?


I have successfully installed MySQL or MariaDB, after rebooting my system and running mysql -u root -p, I get the following error message:
[~]$ mysql -u root -p
Enter password: 
ERROR 2002 (HY000): Can't connect to local MySQL server through socket '/var/lib/mysql/mysql.sock' (2)
This definitely might be because you haven’t start MySQL server or MariaDB server.
Open Terminal and the command below to check the status:
# service mysql status
If the command above returns an error, you have definitely not started the server after booting.
Now start MariaDB:
# systemctl start mariadb.service

OR

# systemctl start mysqld.service

Enable auto start at boot time:
# systemctl enable mariadb.service

OR

# systemctl enable mysqld.service

If after all these and you still can’t access MariaDB, it means your installation wasn’t completed successfully: