
How to Set Up a Captive Portal Using pfSense
PfSense provides an easy way to set up a captive portal for your network. Using the portal allows you to direct the users on your network to a specific web page before they are allowed to access the internet. The web page can be a simple page with instructions and terms of use, or a page that requires a username and password for authentication.
Captive portals are most commonly used for wireless hotspots. If you've ever used the wireless network at a hotel or airport then you have most likely clicked through a portal before you were able to go online. They can also be used on wired connections for business centers, internet Cafés, or your home!
Once the portal has been enabled any computer that points to the pfSense router as the gateway will be automatically redirected to the portal landing page.
Basic Portal Without Authentication
First I'm going to show you how to set up a basic portal without any authentication. Clients connecting to the network will be redirected to an HTML page of your choice. This page can display any message or image that you wish. They must click through the portal by clicking the continue button before they will be granted access to the network.
1. Enable the captive portal - To enable the portal click on captive portal which is found in the services menu of pfSense. Select the check box "Enable captive portal"
2. Select the interface - Most users will select the LAN interface. The captive portal can only run on one interface at a time and pfSense is not able to act as a reverse portal.

Enable the captive portal and select the interface it will run on.
3. Upload a portal page - You must upload an HTML/PHP file to use as a landing page for clients connecting to the portal.
In the section called "Portal page contents" click the "Choose File" button and select the HTML page you want to use. When you are finished click the save button at the bottom of the page to apply the changes.
To verify that your HTML file was successfully uploaded click on the "view current page" button directly below the HTML file upload box.

Upload an HTML file to serve as the portal page.
4. Testing the Basic Portal - To make sure everything is working simply try to access a webpage from a computer on the network.

If everything is functioning correctly the browser will be redirected to the landing page. Once you click continue the browser should continue to the originally requested URL.
Troubleshooting Tips
- If the portal page does not load verify the HTML file was uploaded correctly.
- If the captive portal is running on a VLAN interface make sure the parent VLAN is not assigned to another interface.
If the captive portal is working users should be directed to the landing page when they first connect to the internet.
Using Authentication
Another popular reason for using captive portals is to provide a system for authenticating users before they are granted access to the internet.
Users that do not have a valid username and password will not be granted access to the network.

When authentication is enabled users must enter a username and password to access the network.
Local Database vs Radius
The simplest way to set up authentication is to use the local user database on pfSense. If you have a lot of users to manage I would recommend using radius authentication since it is much more flexible.
You can configure the captive portal to point to a remote radius server or you could install the FreeRadius package directly on pfSense. Radius integrates well with existing authentication systems such as active directory, etc.
Initial Setup
To get started follow the steps in the previous section above to enable the captive portal and select an interface.
Modifying the HTML
In order for this to work you will need to use a slightly different HTML landing page that has username and password fields. You can check out my sample HTML page and modify it to suit your needs. Follow the instructions in step 4 of the previous section to upload the page.
For these examples I'm demonstrating pretty basic landing pages but I'll show you how to customize them later.
Enabling Authentication
To enable authentication select either local or radius authentication on the main captive portal settings page. Click on the save button to activate the changes.
 Select either local or RADIUS as an authentication type.
Creating Local Users
If you selected local user manager as your method of authentication then you'll need to create some users. If you plan on setting up a large amount of users I would recommend using radius, LDAP, or active directory instead of the local database.
If you don't expect to set up many accounts then this option works well because it's so simple. In some cases you might want to let users share a common username and password, and that's a perfectly valid option too.
To create users in pfSense open the user manager which is found under the system menu. Then simply click on the plus symbol to create a new user.

The pfSense user manager can be used to create local accounts for the captive portal.
Configuring the User Account
To create a simple user you only need to enter a username and password. There are a few other useful options worth checking out though.
Expiration Date - This option allows you to define a date that the account will automatically expire. So if you know the account is temporary this will save you the trouble of having to manually disable the account. If you leave this field blank the account will always be active.
Group Membership - Groups are handy for organizing your users. Groups can be assigned access to administrate certain parts of the pfSense web GUI. For the purposes of the portal groups really aren't that useful.

Setting up users is pretty straight forward. You need a username and a password, that's
Customizing the Portal Page
If you want to make the portal landing page look a bit nicer you can add your own images and custom PHP code.
To upload an image click on the file manager tab in the captive portal settings. In order for files to be used by the portal they must have a prefix of "captiveportal-" in the filename.
You can then reference the files using standard HTML image tags. To see an example download the HTML page with an image link I created.

The portal landing page can be customized with images and PHP.

Other settings and Performance Hints
On the main captive portal page there are a number of other settings you can adjust to customize how the portal functions. Below are the descriptions for some of the settings I think are useful.
Idle timeout - If a user is idle for a certain number of minutes they will be automatically disconnected. I recommend setting an idle timeout to keep resources from getting tied up on your pfSense system. You don't want to set the timeout to be too low or your users will be frustrated, even setting it to something like 8 hours will help.
Redirection URL - By default users will continue to the web page they originally requested after passing through the portal. This setting allows you to force clients to be directed to a page of your choice after connecting. Users can then enter a new URL and browse the web normally.
Concurrent user logins - Enabling this setting will allow only one connection to the portal per user. This will prevent users from making multiple connections using the same username and password.
Configure Captive Portal Group settings
- Go to the User Manager by navigating to System -> User Manager in the top menu

- Click on the Group tab to switch to the overview with groups

- Click on the + icon to create a new group

- Fill in any name you would like to assign to this group at Group name and click Save at the button to create the new group.

- After hitting save, you will return to the Group manager page where you should now see your group having been added. Click on the E icon right of the row with your new group to edit the newly created group.

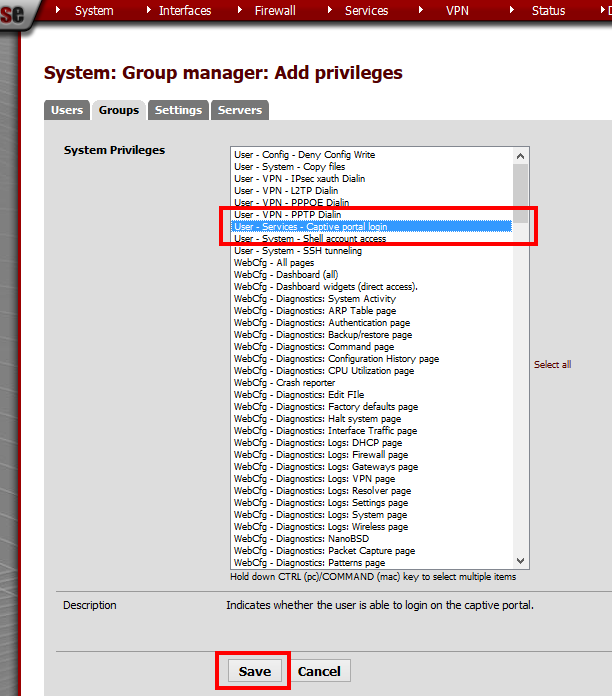
- You will now notice an extra option is available, compared to seeing this similar screen at step 4 when creating the group, namely Assigned Priviledges. Click on the + icon in this section.

- In the list with priviledges, select the row stating User - Services - Captive portal login. If this row is not in the list, you most likely haven't enabled the captive portal yet. You need to do this before you can assign rights for it to a group. Hit save at the bottom to add the priviledge to this group
- You will now see the rights to log in to the captive portal have been added to this group. With the Group Memberships section on this page you can add or remove users to/from this group. Users in this group will be able to log on through the captive portal using their credentials.


No comments:
Post a Comment