
Step 2. Add the DHCP role
After completing Step 1, you now should see that Active Directory Domain Services and DNS server are installed (you can verify this in Server Manager, Roles, Roles Summary).

Select DHCP Server and click next.

Review the information about DHCP server...

and if you have more than one network card in your Windows 2008 server, select the one which will be handing out ip's (in my case that is 192.168.3.1), I removed the tick from the other network card listed

next you will need to clarify which DNS server ip address to listen to, I changed it from my second nic's ip address 192.168.3.1, clicking on Validate will verify that it's ok

enter your WINS settings, I went with the default and clicked next,

next we have to input our DHCP server scope options, to do this click on Add

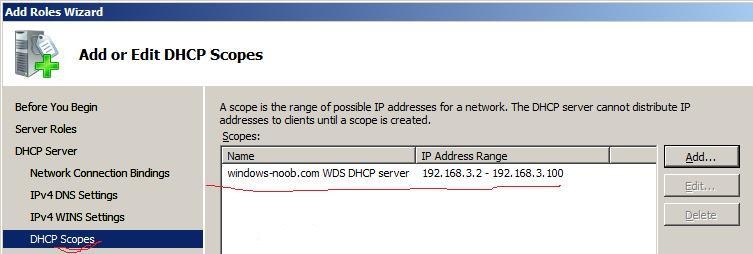
enter your scope settings (mine are listed below)

click ok and your DHCP scope will now be listed
Quote:
Windows Server® 2008 supports stateless and stateful DHCPv6 server functionality. DHCPv6 stateless mode clients use DHCPv6 to obtain network configuration parameters other than the IPv6 address, such as DNS server addresses. Clients configure an IPv6 address through a non-DHCPv6 based mechanism such as IPv6 address auto-configuration (based on the IPv6 prefixes included in router advertisements), or static IP address configuration.
In DHCPv6 stateful mode, clients acquire both the IPv6 address as well as other network configuration parameters through DHCPv6.


After completing Step 1, you now should see that Active Directory Domain Services and DNS server are installed (you can verify this in Server Manager, Roles, Roles Summary).
Now that we are in server manager lets click on Add roles again followed by next.
Select DHCP Server and click next.
Review the information about DHCP server...
and if you have more than one network card in your Windows 2008 server, select the one which will be handing out ip's (in my case that is 192.168.3.1), I removed the tick from the other network card listed
next you will need to clarify which DNS server ip address to listen to, I changed it from my second nic's ip address 192.168.3.1, clicking on Validate will verify that it's ok
enter your WINS settings, I went with the default and clicked next,
next we have to input our DHCP server scope options, to do this click on Add
enter your scope settings (mine are listed below)
click ok and your DHCP scope will now be listed
click next and you'll get IPV6 options, I chose to disable this as I'm not using IPv6 yet
Quote:
Windows Server® 2008 supports stateless and stateful DHCPv6 server functionality. DHCPv6 stateless mode clients use DHCPv6 to obtain network configuration parameters other than the IPv6 address, such as DNS server addresses. Clients configure an IPv6 address through a non-DHCPv6 based mechanism such as IPv6 address auto-configuration (based on the IPv6 prefixes included in router advertisements), or static IP address configuration.
In DHCPv6 stateful mode, clients acquire both the IPv6 address as well as other network configuration parameters through DHCPv6.
next we are asked about DHCP credentials for the AD DS, I stayed with the default,
and then we will see a summary of our actions and choices for the DHCP server role
clicking on Install will apply these settings and after some time you should hopefully see the following:-


No comments:
Post a Comment