Lync Server 2013 Step By Step Installation and Configuration
- Then next next and next configure certificate validation period as per your policy i did 5 weeks
Now on Lync Server should be on domain
Change the computer name then joined the domain
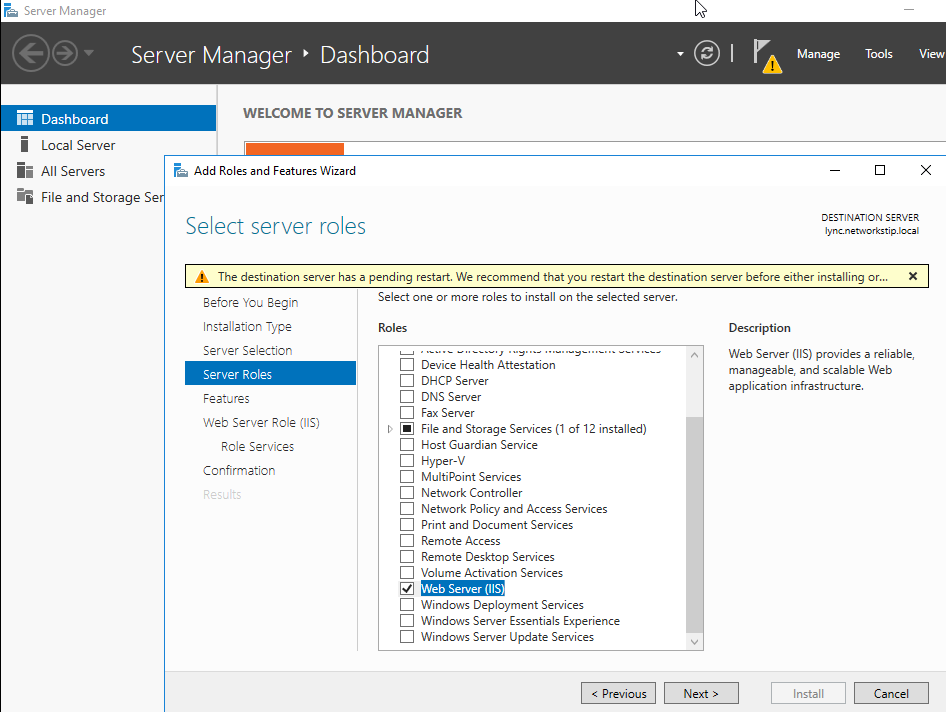
- Webserver IIS Role


- Install latest version of Microsoft Silver Light
- 1st click on active Directory Preparation
- Then click on Prepare Schema and run
- Then click on Prepare Current Forest then Select Local domain and run
Now on DC Server Configure Group Permission
- All looks Good just click on exit
- Now Configure the permissions of Microsoft Lync server to the administrator
Now on Lync Server Configure
- Now open Lync server deployment wizard
- Then Click Prepare First Standard Edition Server next and finish
Now on DC Server
- Now go to DNS Manager click on Forward look up zones and then click on domain and configure Other New record (Srv)
- Click create record
- Then click on Install Administrative Tools
- Click next and then again Next no need to configure additional sip
- Next and fill to form name example local and fill other info as per yours next check open new pool check finish
- New Pool wizard will open click next and configure pool
- click next
- click next
- then check box of collocate Mediation Server should be check
- Click next then click next now you should be on Define the File Store

- Now 1st create a share folder in C drive and share it and configure groups access
- click on then next next click new office webapp
- If you want to create office web app then configure other wise uncheck
- next and then finish
- right click and edit and configure administrator URL access
- click on server management server and select your site then click ok
- Now click on action and publish topology next next
- In this case use full computer name instead of domain
- next next then finish
- Next Next finish
- Now run setup2 remove lync server Components
- If found this error then install the rewrite module from Microsoft click here to download
- Now Run step 3 Install or Assign Certificates
- Click Request
- Select Standalone CA From the List
- Root CA
- create new private key
- Certification Authority Account leave blank and click next
- Specify Alternate Certificate Template click next
- Name and Security write any name Fill the form as per requirement next next
- Now Click next next and Finish
Now on Back to DC Server
- Right click on certificate on go to all task then issue certificate
- Then Next next Finish
- click on now Assign then simply next next finish
- finally Certificate is issued now repeat the above step same for the oth token issue click request
- Primary name should not be same as above certificate
- When you click on the assign for oauth token issuer make sure you selected Othtoken issuer for assigning
- If does not show any certificate then restart server
- Double click to select specific certificate then next
- Now Click and Run (Services Status Optional)
- Start Server Front-End service manually
- Now Go to Domain controller and create account in active directory in my case i created jawad and nafees
- Then Go to Lync Server and open Lync server control panel
- Enable users in lync control panel
- Click to add
- click on user to add user then configure domain pool
- Then click on enable
- Now just login from lync client
- by providing user creds
login to client machine
- client jawad pc
- Client Nafees pc
- In Case of error
- Cannot sign in because the server is temporarily unavailable.
Solution


No comments:
Post a Comment