NETWORKSTIP Networking CCNA,Centos,Ubuntu,Sql,

Made By Muhammad Nafees

Breaking

Showing posts with label RHEL 7. Show all posts

Monday, 21 January 2019

January 21, 2019

OS Ticket installation in Centos 7


INSTALLATION OS TICKET PANEL
Execute the following command to setup the LAMP server.
  •  yum install httpd php php-{cli,common,gd,mysql,imap,mbstring,xml} mysql mysql-server -y
Run the following command to test the PHP installation by setting up info.php file under the root document.
  •  echo -e " < ?php
        phpinfo()
    ?> "  >  /var/www/html/info.php 
  • cat /var/www/html/info.php
  • service httpd start
  • chkconfig --levels 235 httpd on
  • service mysqld start
  • chkconfig --levels 235 mysqld on
  • mysql_secure_installation
Set root password? [Y/n] y
Remove anonymous users? [Y/n] y
Disallow root login remotely? [Y/n] y
Remove test database and access to it? [Y/n] y
Reload privilege tables now? [Y/n] y 

Now Create data base in SQL
  •  mysql -u root -p
  • create database osticket;
  • CREATE USER 'osticket'@'localhost' IDENTIFIED BY 'nafees123';
  • GRANT ALL PRIVILEGES ON osticket.* TO 'osticket'@'localhost';
  • FLUSH PRIVILEGES;
  • show databases;
  •  sudo yum -y install git
  •  git clone https://github.com/osTicket/osTicket-1.8
  •  sudo su
  •  cp -R osTicket-1.8/* /var/www/html/
  • cd /var/www/html/ 
Load the browser with the server ip address/localhost.
 But we are missing a few packages that are needed to move on with the installation.
  •  yum -y install php-xml php-gd php-mbstring php-imap
  • yum install php-pecl-apcu
  • yum --enablerepo=remi install php-intl
  • systemctl restart httpd
     
     
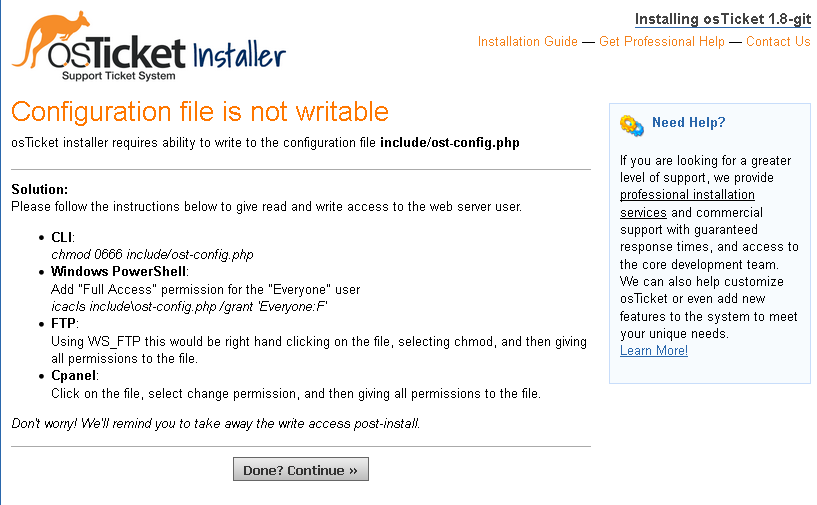
  •  cd /var/www/html/include
  •  cp ost-sampleconfig.php ost-config.php


Wednesday, 5 December 2018

December 05, 2018

Install PHP 7.2 on CentOS 7 To Resolve Clipbucket 4 Installation Problem

Install PHP 7.2 on CentOS 7 To Resolve Clipbucket 4 Installation Problem PHP Recommend Version for Clipbucket

Enabling Remi repository

  • sudo yum install epel-release yum-utils
  • sudo yum install http://rpms.remirepo.net/enterprise/remi-release-7.rpm 

Installing PHP 7.2 on CentOS 7

  • sudo yum-config-manager --enable remi-php72

Once the repository is enabled install PHP 7.2 and few most common PHP modules:

  •  sudo yum install php php-common php-opcache php-mcrypt php-cli php-gd php-curl php-mysqlnd

Verify the PHP installation, by typing the following command which will print the PHP version: 

  • php -v 

OutPut 
PHP 7.2.9 (cli) (built: Aug 15 2018 09:19:33) ( NTS ) Copyright (c) 1997-2018 The PHP Group Zend Engine v3.2.0, Copyright (c) 1998-2018 Zend Technologies with Zend OPcache v7.2.9, Copyright (c) 1999-2018, by Zend Technologies

 Installing PHP 7.1 on CentOS 7

Enable the PHP 7.1 repository by typing: 
  • sudo yum-config-manager --enable remi-php71
Install PHP 7.1 and few most common PHP modules:
  • sudo yum install php php-common php-opcache php-mcrypt php-cli php-gd php-curl php-mysql 
  • php -v 
OutPut
PHP 7.1.21 (cli) (built: Aug 15 2018 17:56:55) ( NTS )
Copyright (c) 1997-2018 The PHP Group
Zend Engine v3.1.0, Copyright (c) 1998-2018 Zend Technologies
    with Zend OPcache v7.1.21, Copyright (c) 1999-2018, by Zend Technologies
  
  • sudo systemctl restart httpd 

 Configuring PHP 7.x to work with Nginx

  • sudo yum install php-fpm
By default PHP FPM will run as user apache on port 9000. We’ll change the user to nginx and switch from TCP socket to Unix socket. To do so edit the lines highlighted in yellow:
  • /etc/php-fpm.d/www.conf
...
user = nginx
...
group = nginx
...
listen = /run/php-fpm/www.sock
...
listen.owner = nginx
listen.group = nginx 


Make sure the /var/lib/php directory has the correct ownership:
  • chown -R root:nginx /var/lib/php
Once you made the changes, enable and start the PHP FPM service: 
  • sudo systemctl enable php-fpm
  • sudo systemctl start php-fpm 
  • sudo systemctl restart nginx
     
December 05, 2018

Completely remove MariaDB or MySQL from CentOS 7 or RHEL 7

Completely remove MariaDB or MySQL from CentOS 7 or RHEL 7


  •  sudo yum remove -y mariadb mariadb-server && sudo rm -rf /var/lib/mysql /etc/my.cnf
If Above Command does not work

  • yum remove mariadb mariadb-server
  • rm -rf /var/lib/mysql
  • rm /etc/my.cnf
  • yum install mariadb mariadb-serve
  • yum remove MariaDB-server MariaDB-client
  • sudo systemctl stop mysqld.service && sudo yum remove -y mariadb mariadb-server && sudo rm -rf /var/lib/mysql /etc/my.cnf
  • rpm -qa | grep mariadb
  • rpm -e --nodeps "mariadb-libs-5.5.56-2.el7.x86_64"
  • rpm -e --nodeps "mariadb-server-5.5.56-2.el7.x86_64"
  • rpm -e --nodeps "mariadb-5.5.56-2.el7.x86_64"
  • rm -f /var/log/mariadb
  • rm -f /var/log/mariadb/mariadb.log.rpmsave
  • rm -rf /var/lib/mysql
  • rm -rf /usr/lib64/mysql
  • rm -rf /usr/share/mysql

Sunday, 18 November 2018

November 18, 2018

CentOS 7 SSH key for no password Authentication login with RSA Key

CentOS 7 SSH key for no password Authentication login with RSA Key

 1. ssh-keygen -t rsa
 just simply press enter
if you want to configure password on Rsa file just type a password to protect the other wise leave it blank in my case i am typing password nafees12345

key is generated now copy the id-rsa file in to your pc
next is change mode
2. chmod 700 ~/.ssh 
3. mv ~/.ssh/id_rsa.pub ~/.ssh/authorized_keys

the above command no 3 will change the rsa.pub file to authorized_key this file will used when we try to login via ssh and ssh will match the rsa key from this file now change the mode of file
4. chmod 600 ~/.ssh/authorized_keys 
5. vi /etc/ssh/sshd_config 


 6. systemctl restart sshd

7.Go to official Putty download page, grab the last version of the Putty Windows Installer executable package and install it onto your Windows computer. 

 8.After you have finished installing Putty go to Windows Start, type putty string to search field and open PuTTygen program which you will use it to generate Keys pairs.


Click on load and load the
Now type tha passphrase key which is in my case nafees12345


clik on save private key to save key for putty access
Open putty to left Category menu, select SSH –> Auth, hit the Browse button, search and add your Private Key.


just type user name root and done
November 18, 2018

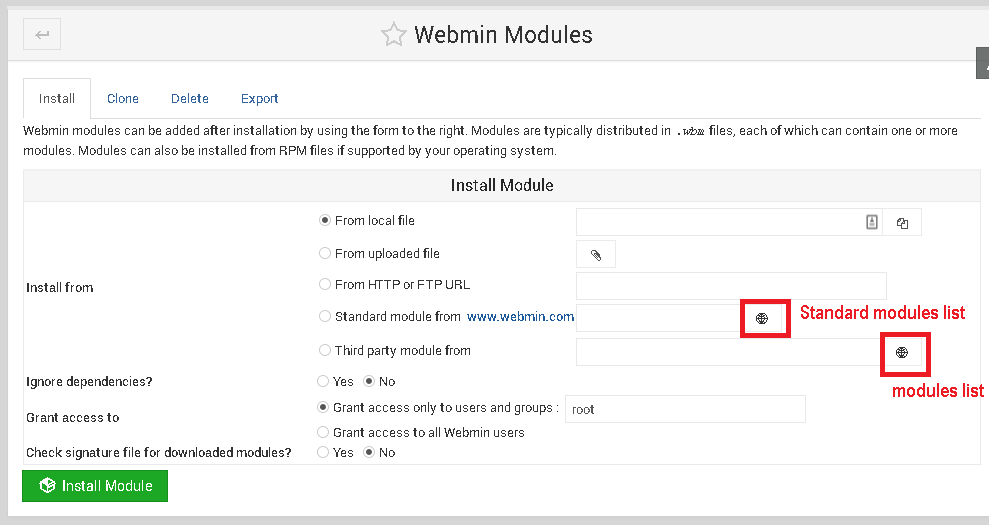
How to install Modules in webmine

How to install Modules in Webmine


As i am installing PPTP Server 


After Installation it shows like this
done but shome times it shows an error  Installed but hidden from view Now go to directory /usr/libexec/webmin/[module name]/module.info


November 18, 2018

How To Enable Two Factor Authentication in Virtualmin

How To Enable Two Factor Authentication in Virtualmin


  • Click on the Webmin section
  • Select the Webmin option
  • Select the Webmin Configuration module


  •  Click on the Two-Factor Authentication module
 
  • Select your authentication provider
    1. For the purpose of this article I will be selecting Google Authenticator
  • Click the Save button


When using Google Authenticator a QR code will display that you can scan using the Authenticator app on your smartphone.
if there is any error follow blew steps

Install Perl Packages

Using SSH (shell), enter these commands one by one,
  • yum install gcc
  • yum install 'perl(Moose)'
  • yum install 'perl(Digest::HMAC)'
  • yum install 'perl(Module::Build)' 
This will install all required perl packages for Source build and supporting WebMin Two Factor Authentication.

Note: If you get error “No package perl(Moose) available” then please go through this short guide to install perl-Moose from tar package.

Pull Authen::OATH source package and Unzip it

Now, you must pull fresh package from CPAN,
wget http://www.cpan.org/authors/id/S/SI/SIFUKURT/Authen-OATH-v1.0.0.tar.gz
 
 Unzip it using,

tar -xvf Authen-OATH-v1.0.0.tar.gz

Extract, Build & Install Authen::OATH Perl Package

Change the directory to newly extracted folder. In my case, I issued following command,
cd Authen-OATH-v1.0.0
 
Enter these commands one by one,

  • perl Build.PL
  • ./Build
  • ./Build test
  • ./Build install

Restart WebMin – Very Important.

service webmin restart


Tuesday, 4 September 2018

September 04, 2018

How to Install Webmine Virtualmin (CentOS 7)

How to Install Virtualmin (CentOS 7)

How Do I Install Virtualmin On CentOS 7?

This tutorial implies that you’re using the root account on a server to perform the installation and that you have a basic working knowledge of a Linux shell. Although this tutorial is written strictly for CentOS 7, Virtualmin offers an automated installation script for the following distros:

  • CentOS/RHEL/Scientific Linux 7 on x86_64
  • CentOS/RHEL/Scientific Linux 5 and 6 on i386 or x86_64
  • Debian 6, 7, and 8 on i386 or amd64
  • Ubuntu 12.04 LTS, 14.04 LTS, and 16.04 LTS on i386 or amd64 (non-LTS releases are not supported)
The following steps can be utilized to install Virtualmin in a CentOS 7 (RHEL 7) environment.  

  • Ensure your server is up to date
        yum update -y
  •  Install perl for the Virtualmin script to execute correctly
          yum install perl -y


  • Download the Virtualmin installer script using wget
         wget http://software.virtualmin.com/gpl/scripts/install.sh
  • Make the script executable
          chmod +x install.sh
  • Execute the install script
        sh install.sh
 As per the warning when the script is executed ensure that your OS is listed and type “y” then press “Enter” to continue with the installation


Installation complete successfully 


If prompted you may need to enter in a fully qualified hostname Please note that this domain name will need to resolve to your server

  • Click the “Next” button

  • Select if you’d like to run clamd in the background
  • Click “Next”

  • Select if you’d like to run spamd in the background
  • Click “Next”
  • Select if you’d like to run a MySQL server, PostgreSQL server or both
  • Click “Next”

  • Set a root password for the database server (MySQL/PostgreSQL)
  • Select if you’d like to remove the test MySQL database
  • Select if you’d like to remove the anonymous MySQL user
  • Click “Next” 
 
  •  Select the appropriate configuration for your system
  • Click “Next”
 
  •  Set the Primary nameserver
  • Set the Secondary nameservers if needed
  • Click “Next”

  • Select to store plain-text or hashed password
  • Click “Next”
 

The Post-Installation Wizard should now be complete and you should be able to start using your new control panel. The first thing you should do is create a new virtual server so that you can begin hosting your site(s). We have written the following article to help you set up a virtual server in Virtualmin: Creating a New Virtual Server in Webmin/Virtualmin

Creating a New Virtual Server in Webmin/Virtualmin


To add a new site/domain (Virtual Server) to Webmin please use the following steps.

  1. Login to Webmin
  2. Select Virtualmin
  3. Select  the Create Virtual Server option


  1. Fill in the required information for the domain
    1. New virtual server type
      1. Top-level server
      2. Sub-server
      3. Alias
    2. Domain name
    3. Description
    4. Administration password
    5. Server configuration template
    6. Account plan
    7. Administration username
  2. Click Create Server
 How To Install SSL Let's Encrypt Certificate in Webmine 
  •  1st of all we need to enable ssl apache feature on virtual server
 
After that follow these steps
  • Click on Server Configuration
  • Then Manage SSL Certificate 
  • Just click on Request Certificate


Tuesday, 3 July 2018

July 03, 2018

VSFTPD with Samba Server on Centos

VSFTPD with Samba Server on Centos

Installing VSftpd FTP Server on CentOS
 VSftpd is an FTP server for Linux.

 Install the VSftpd Server

Type the following command to install the VSftpd FTP Server: 
[root@centos7 ~]# yum install vsftpd  

Backup the default configuration file ‘vsftpd.conf’:
[root@centos7 ~]# cp /etc/vsftpd/vsftpd.conf /etc/vsftpd/vsftpd.conf.back 

We also need to install the FTP client, so that we can connect to an FTP server: 
[root@centos7 ~]# yum install ftp 

Monday, 23 April 2018

April 23, 2018

RAID levels

RAID levels 

RAID is a technology that is used to increase the performance and/or reliability of data storage. The abbreviation stands for Redundant Array of Inexpensive Disks. A RAID system consists of two or more drives working in parallel. These disks can be hard discs, but there is a trend to also use the technology for SSD (solid state drives). There are different RAID levels, each optimized for a specific situation. These are not standardized by an industry group or standardization committee. This explains why companies sometimes come up with their own unique numbers and implementations. This article covers the following RAID levels:

  • RAID 0 – striping
  • RAID 1 – mirroring
  • RAID 5 – striping with parity
  • RAID 6 – striping with double parity
  • RAID 10 – combining mirroring and striping

Monday, 22 January 2018

January 22, 2018

Change a server's hostname in CentOS

Change a server’s hostname

Using a text editor, open the server’s /etc/sysconfig/network file.

# sudo nano /etc/sysconfig/network
 
Modify the HOSTNAME= value to match your FQDN hostname. 

HOSTNAME=myserver.domain.com 

Thursday, 20 October 2016

October 20, 2016

How to Change Hostname and ip in RHEL / CentOS 7.0

How to Change Hostname in RHEL / CentOS 7.0

You have probably needed to change the hostname of your CentOS 7 install for one reason or the other. Changing the hostname in CentOS 7 is now much simpler than ever.
If you are ready open up your terminal and follow through this tutorial, and in less than 10 minutes you will have changed your hostname!

Check Hostname

To check the hostname open your terminal and type the following command:
  • $ hostname
By default the hostname is localhost.localdomain. To change this you can follow the following steps

Edit /etc/hostname File

The easiest way to change the hostname is to edit the /etc/hostname file. Open your terminal and with your favourite text editor delete localhost.localdomain and change to whatever name you like.
  • $ sudo vi /etc/hostname
Save changes and then confirm your hostname by using hostname command. If it has not changed then you need to restart the CentOS 7 server.

Using Hostnamectl

Hostnamectl is a tool that is used control the Linux system hostname. You can also use this tool to change the hostname in a few easy steps.
First and foremost confirm the hostname by using hostnamectl as follows:
  • $ hostnamectl status

 To change the hostname type the command:
  • $ hostnamectl set-hostname grace

 It may be necessary to restart the systemd-hostnamed daemon so that as to reflect the change in Static hostname.
  • $ sudo systemctl restart systemd-hostnamed


Note: Hostnamectl recognizes three types of hostnames: pretty, static and transient. Pretty is stored in/etc/machine-info and is a human readable format while static hostname is stored in /etc/hostname. Transient hostname is more of a temporary hostname which may take up the static hostname when network connectivity is lost.

Using Nmtui

To change the hostname you can also use the NetworkManager text interface tool (nmtui). This is also another very easy method and fairly straight forward.
From the command line invoke nmtui:
  • $ sudo nmtui
This will present to you a text user interface like this. Using the arrow keys select Set system hostname and use tab to select OK.
Edit the hostname which by default is localhost.localdomain and change it to whatever you prefer.
After changing the hostname, choose okay, then the following confirmation message will appear. If the hostname is as you desire you can choose OK. You can confirm changes using the hostname command. 

Using Nmcli

Nmcli is a command line tool for controlling the NetworkManager and can also be used to change the hostname.
To check the hostname with nmcli, type in your terminal:
  • $ nmcli general hostname
This will print out the hostname to your terminal. By default in CentOS 7 it should be localhost.localdomain.
To change this use the command:
  • $ nmcli general hostname grace
This will request for your password via a GUI interface. If you are running this command remotely remember to use root or sudo:
  • $ sudo nmcli general hostname grace
You can then check the hostname with the command hostname or nmcli general hostname.