NETWORKSTIP Networking CCNA,Centos,Ubuntu,Sql,

Made By Muhammad Nafees

Breaking

Showing posts with label windows 10. Show all posts

Saturday, 16 May 2020

May 16, 2020

Hide Files inside Image or PDF files


Hide Files inside Image or PDF files
  • Some times, we have to hide some files for particular reason like classified files and we do not want it be found by others.You just need :
  • Image File or PDF File
  • Files which are going to be hidden
  • Archiver Application (WinRar, 7Zip, etc.)
  • Command Prompt
  • Now just follow this steps :
  1. Compress your files and make them as archive file. In this example, I'm going to hide my test.rar file into my PDF (readme.pdf)
  2.  Open your Command Prompt and run it As Administrator, direct to your files location, then type this command exclude quote marks : "copy /b readme.pdf + test.rar redme.pdf". Please adjust readme.pdf with your own PDFfile, test.rar with your own compressed file, and redme.pdf with your own new PDF name and this is up to you to give the name. After that, click ENTER button.
  3.  If you did it right, you will get a New PDF files with bigger file size, because the binary codes between test.rar and readme.pdf are combined into one file is redme.pdf
  4. To open your hidden files, you just open your archiver application, in this example is WinRar. Go to your PDF files and extract it. You will get new folder named redme and you will find your test folder inside it.

Thursday, 19 March 2020

March 19, 2020

Block Copy Data From RDP Server 2012 & Server 2016

Clipboard Redirection Group Policy

Server 2016 

  • Type gpedit.msc inside the elevated command prompt.

  • Navigate to Computer Configuration -> Administrative Templates -> Windows Components -> Remote Desktop Services -> Remote Desktop Session Host. 
  •  Make sure the option Do not allow Clipboard redirection is Enabled.
  •  Make sure the option Do not allow Drive redirection is Enabled.
Note According to your Environment if you are using domain then apply policy according to your situation on Targeted OU or Site or Domain 


Server 2012

  • Navigate to Computer Configuration -> Administrative Templates -> Windows Components -> Remote Desktop Services -> Remote Desktop Session Host -> Device and Resource Redirection
  • Make sure the option Do not allow Clipboard redirection is Enabled.
  •  Make sure the option Do not allow Drive redirection is Enabled.
 2nd Methond for Server 2012
  • Win+R keys to open the Run dialog box
  • Type ServerManager -> press Enter.
  • Click on the Remote Desktop Services -> select Collections.
  • Select Tasks -> choose Edit Properties.
  • Under the Client Settings tab -> make sure Clipboard and Drive is disabled. 

Windows 10

  • Type gpedit.msc inside the elevated command prompt.

  • Navigate to Computer Configuration -> Administrative Templates -> Windows Components -> Remote Desktop Services -> Remote Desktop Session Host. 
  •  Make sure the option Do not allow Clipboard redirection is Enabled.
  •  Make sure the option Do not allow Drive redirection is Enabled.


Monday, 22 April 2019

April 22, 2019

2 Fector Authentication For windows and Server Free saaspass

 2 Fector Authentication For windows and Server Free

  • 1st download Windows software from given link
  • https://saaspass.com/downloads/
  • install software in your server or windows 
  • open software will show screen like blew
  • Now download the android application on your mobile from play store
  • after Installation android app set 4 digit pin


  • Click Get Started
  • Then configure recover email and phone you will get email in to your inbox and a sms message on you phone No


  • Now Open SaasPass Software on your Desktop PC
  • Now Scan bar code from you saaspass app or just type Saasid in to desktop software then press push login you will get message in to mobile  Login click login

  • Type Pc password and activate and finish
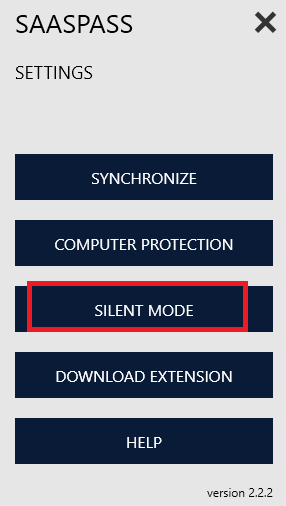
  • Run software as a silent mode
  • Click settings 

  • You can lock or unlock PC from andriod APP by click Remote lock and unlock

  • other way is just scan screen bar code form andriod app 
 

  • or just Click to push login you will receive message on mobile to unlock or type pc password & one time code from saaspass app

Monday, 18 February 2019

February 18, 2019

Add a Static TCP/IP Route to the Windows Routing Table

What is routing table:

In computer networking a routing table, or routing information base (RIB), is a data table stored in a router or a networked computer that lists the routes to particular network destinations, and in some cases, metrics (distances) associated with those routes. The routing table contains information about the topology of the network immediately around it. The construction of routing tables is the primary goal of routing protocols. Static routes are entries made in a routing table by non-automatic means and which are fixed rather than being the result of some network topology "discovery" procedure. 

How To Check windows Routing Table:

  • Run as Administrator CMD
  • Then Type Route Print 

  •  Now Add A Route Manually 
  •  route ADD destination_network MASK subnet_mask  gateway_ip metric_cost
  • route -p add 101.50.64.229 mask 255.255.255.255 172.21.48.1
  • -p if you’re just adding one or two static routes that you don’t expect to change often, you can instead just add the -p option to the command to make the route persistent. A persistent route stays in place even when Windows starts up. Using the same command we used earlier, you could make that route persistent with the following modification

 
  • What is the Scenario in our case we add a router with 101.50.64.229 mask 255.255.255.255 172.21.48.1
Explanation :In our case as we configure a route with a local PC Gateway 172.21.48.1 and subnet mask 255.255.255.255 will be only router traffic to 101.50.64.224 no other traffic will be router from this Gateway because we have an other Default router with 0.0.0.0 0.0.0.0 with Gateway 172.16.0.1.
What ever traffic come from this network 172.21.48.1 255.255.255.255 will be router to 101.50.64.224
there is no need to configure Multi Gateway on NIC Just configure IP and subnet mask as we did.
  • 172.21.48.3  is NIC IP what ever traffic in or out will b use the local gateway 172.21.48.1 and router traffic only to 101.50.64.224 and there is no Multi gateway conflict for traffic.

Remove a Static Route from Windows:

  •  route delete destination_network
  •  route delete 101.50.64.229


Friday, 4 January 2019

Monday, 19 November 2018

November 19, 2018

How do I allow Windows 7 users to run only specific applications

How do I allow Windows 7 users to run only Specific applications?

  • The first thing you must do is open the Group Policy Editor. You won't find a menu entry for this tool. Instead you start the tool by clicking the Start menu and then entering the command gpedit.msc. When this tool opens, you will find yourself looking at a dual-paned window that looks deceptively simple to use (Figure A)
  • Figure A

  • The next step is to navigate to the correct location of the configuration option we want to change. This is to be found in the following path:
    User Configuration | Administrative Templates | System
    When you navigate to that path, you will want to click on the System entry to reveal the available settings in the right pane (Figure B). 
  • Figure B

  • Double-click on the entry for Run Only Specified Windows Applications to open the preferences for this setting. When this is opened (Figure C), you will need to first make sure Enabled is checked. Once you have done that, the Show button will become available.
  • Figure C

     
  • The next step is to click the Show button, which will open a small window where you can enter the allowed applications (Figure D). In this window, you will add, one per line, the executable file name (including extension) for each of the applications you want the users to be allowed to execute. 
  • Figure D

  • After these step just open cmd and type command gpupdate

Sunday, 18 November 2018

November 18, 2018

Install Snipe-it to windows 7 with wamp

Install Snipe-it to windows 7 with wamp

1st of all downloads mention blew item

  • Download install visual c++ redistributable for visual studio 2012 update 4. Install both x86 and x64 version download
  
After installation of these package configure these settings in wamp 

3. Set up your database

  • Open your MySQL console:

Press enter for default password, or enter your master MySQL password if you changed it to something else previously.
 Run the following commands to create and verify database:
  • create database snipeit;
  • show databases;
Create a database user and grant access to your new snipeit database:
  • create user snipe_user;
  • grant all on snipeit.* to 'snipe_user'@'localhost' identified by 'password123';
(Change password123 in the example above to something more secure, please.)

1. Install Composer (composer.exe)

 Browse to C:\wamp\bin\php\php7.0.10\php.exe. 

Extract and configure Snipe-IT and run composer

Download and exact Snipe-IT to c:\wamp\www\snipe-it.
 Edit .env.example
Save your edited env.example as .env
 Open command prompt then change directory to c:\wamp\www\snipe-it\. Then run:
  • composer install --no-dev --prefer-source
     
    After this command it will take some time to download packages  
 

Generate your app key

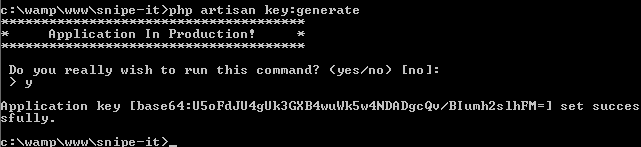
  • php artisan key:generate
 
  This will update the app key in your .env file:

 Be sure to keep this app key in a safe place, as it is necessary for decrypting any encrypted fields you might add.

http://localhost/snipe-it/public/ 


Finnaly done