NETWORKSTIP Networking CCNA,Centos,Ubuntu,Sql,

Made By Muhammad Nafees

Breaking

Showing posts with label Microsoft PXE Server. Show all posts

Wednesday, 11 July 2018

July 11, 2018

Configure seprate User access on WDS Windows Server

Configure separate User access on WDS Windows Server

  • Open Active Directory Users and Computers, click on Computers and right click, choose New, Computer.
  • Give the computer a name
  •  
  •  In WDS services select Active directory Prestaged Devices then right panel select device Name and then click to properties then click on Join Rights tab and then click on configure user.

Sunday, 14 February 2016

February 14, 2016

Setup WDS in Windows Server 2008/Create PXE boot Server on Server 2008 R2 Part 4

Step 4. Configure the Windows Deployment Services gui (mmc snap in)

Click on Start/All Programs/Administrative tools/Windows Deployment Services.

at this point we can see that WDS is not configured yet, so let's do that now.


right click on the server name in the left pane and choose Configure Server


at the welcome page click next


change the remoteinstall path from the default C:\RemoteInstall to D:\RemoteInstall


I put a checkmark in each of the DHCP options then clicked next


I then chose to respond to all known and unknown computers (by default it's set to Do not respond to any)
Please note, if you want to set this option to only respond to known computers, then you can do so, but you will have to prestage your computers in Active Directory to do so


clicking on Finish applies these settings

when done, you'll be told that the configuration is complete and that you can now add images to the WDS server, click on Finish (again).


Step 5. Adding boot.wim and install.wim

Note: You should use only the boot.wim file from the Windows Server 2008 DVD. If you use the boot.wim file from the Windows Vista DVD, you will not be able to use the full functionality of Windows Deployment Services for example, multicasting. If you have the Windows Vista SP1 dvd, you can safely use that for the boot.wim.


The Windows Deployment Add image wizard will appear, insert your Windows 2008 Server DVD and click Browse, select the sources folder on the Windows 2008 DVD and then click next


you'll be prompted to create a new image group, lets call it ImageGroup1 (the default name, you can change it later to Windows Server 2008 or Windows Vista Sp1 or whatever...).


review your settings and click next when ready


After a long while, the selected images will be added to the WDS server

click finish and review the WDS server as it is now

in the Boot Images pane, you should see Microsoft Windows Longhorn Setup (x86) and this is the original boot.wim file from the Windows 2008 Server DVD, please note that this is the default description name of the image, you could change it when addint the boot.wim image to something more descriptive 
 as in this example


In the Install Images pane, we can see the six available images from the Windows 2008 Server DVD, these are based upon the install.wim file on the DVD.


you can now PXE boot your client computers to the Windows 2008 WDS server.


troubleshooting note: if you add a new image to WDS and attempt to pxe boot and then install the image but get an error saying something like 'could not display the list of' then make sure you have used BOOT.WIM from a Windows Server 2008 DVD or Windows Vista sp1. 

Friday, 12 February 2016

February 12, 2016

Setup WDS in Windows Server 2008/Create PXE boot Server on Server 2008 R2 Part 2

Step 2. Add the DHCP role
After completing Step 1, you now should see that Active Directory Domain Services and DNS server are installed (you can verify this in Server Manager, Roles, Roles Summary).


Now that we are in server manager lets click on Add roles again followed by next.

Select DHCP Server and click next.


Review the information about DHCP server...

and if you have more than one network card in your Windows 2008 server, select the one which will be handing out ip's (in my case that is 192.168.3.1), I removed the tick from the other network card listed


next you will need to clarify which DNS server ip address to listen to, I changed it from my second nic's ip address 192.168.3.1, clicking on Validate will verify that it's ok


enter your WINS settings, I went with the default and clicked next,


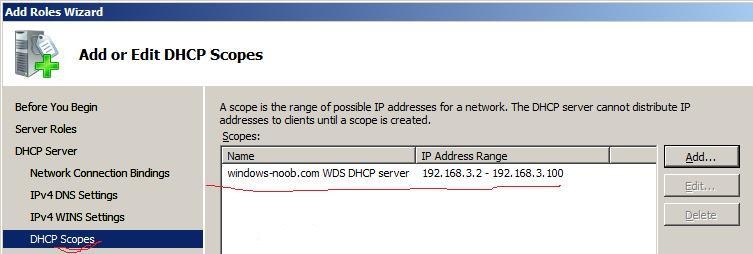
next we have to input our DHCP server scope options, to do this click on Add


enter your scope settings (mine are listed below)


click ok and your DHCP scope will now be listed


click next and you'll get IPV6 options, I chose to disable this as I'm not using IPv6 yet

Quote:
Windows Server® 2008 supports stateless and stateful DHCPv6 server functionality. DHCPv6 stateless mode clients use DHCPv6 to obtain network configuration parameters other than the IPv6 address, such as DNS server addresses. Clients configure an IPv6 address through a non-DHCPv6 based mechanism such as IPv6 address auto-configuration (based on the IPv6 prefixes included in router advertisements), or static IP address configuration.

In DHCPv6 stateful mode, clients acquire both the IPv6 address as well as other network configuration parameters through DHCPv6.


next we are asked about DHCP credentials for the AD DS, I stayed with the default,


and then we will see a summary of our actions and choices for the DHCP server role


clicking on Install will apply these settings and after some time you should hopefully see the following:-


February 12, 2016

Setup WDS in Windows Server 2008/Create PXE boot Server on Server 2008 R2 Part 1

Note: If you already have an Active Directory setup and configured DNS then skip to Step 2 (Setup DHCP).
 If you have already configured AD, DNS and DHCP then please skip to Step 3 (Add the WDS role).
This guide assumes that you have first of all installed Windows 2008 server on your machine and partitioned it as c: (Operating system) and d: (data), note that you can change the partitions after the installation of Windows 2008 server by using disk management and right clicking on a disk and choosing to shrink or extend. This guide is to help you set things up in a LAB. In Production, you have to plan things according to Technet documentation.

Step 1. Setup and configure active directory

Click on Start and choose Server Manager, scroll down to Roles Summary and choose Add Roles.

When the wizard appears click next.

As WDS needs the folllowing:-

Active Directory Domain Services, DHCP, DNS, we will add the following role first:-

Active Directory Domain Services

We must install this role first before continuing to add the other roles, so lets select it and click on next.

As WDS needs the folllowing:-

Active Directory Domain Services, DHCP, DNS, we will add the following role first:-

Active Directory Domain Services

We must install this role first before continuing to add the other roles, so lets select it and click on next.


We will then be informed that installing AD requires us to run dcpromo.exe afterwards to make the server a fully functional domain controller. Click install to continue


once done we'll get the success screen

click close to continue

Once done the server manager will list our ADDS service with a red X beside it, click on it to run Dcpromo.exe.

This will open up the Roles section of Server manager, and we'll see a summary which says This server is not yet running as a domain controller. Run the Active Directory Domain Services Installation Wizard (dcpromo.exe).

Click on the blue text to continue.


This will start the Active Directory Domain Services Installation Wizard. Click on next to continue.


Next we will get a screen telling us that older versions of Windows (pre Vista Sp1 ....) may have problems with a bunch of things including Windows Deployment Services (for more info read KB942564)

Quote

Platforms impacted by this change include Windows NT 4.0, as well as non-Microsoft SMB "clients" and network-attached storage (NAS) devices that do not support stronger cryptography algorithms. Some operations on clients running versions of Windows earlier than Vista with Service Pack 1 are also impacted, including domain join operations performed by the Active Directory Migration Tool or Windows Deployment Services.

click next to continue

Now we get to choose what type of domain we will setup, and for the purpose of this lab, we will select the second option, Create a new domain in a new forest.


next we are prompted for the fully qualified domain name of the forest root domain (eg: Pxe.nafees.com)

Note: if you have not already given this server a good computername, then cancel this process and do so now. The computername will be prepended to whatever FQDN you enter, so if you enter Pxe.nafees.com then the FQDN of this domain controller will be AD1.Pxe.nafees.com


Clicking next will give some addtional options, leave them as they are (DNS Server selected) and click on Next again.


if you get a warning about dynamically assigned ip addresses ignore it (choose yes),


you will most likely get another DNS warning if like me you don't have a Windows DNS server in the forest. Click yes to continue.

Next we are asked where to store the AD database, logfiles and sysvol, stay with the defaults and click next.


and we are then prompted to set the Directory Services restore mode administrator account password

finally we get a summary of our actions


click next to get started


after a while you should see the AD wizard complete. Click Finish


you'll be prompted to restart, so please go ahead and click on Restart Now.