NETWORKSTIP Networking CCNA,Centos,Ubuntu,Sql,

Made By Muhammad Nafees

Breaking

Showing posts with label windows 8. Show all posts

Monday, 18 February 2019

February 18, 2019

Add a Static TCP/IP Route to the Windows Routing Table

What is routing table:

In computer networking a routing table, or routing information base (RIB), is a data table stored in a router or a networked computer that lists the routes to particular network destinations, and in some cases, metrics (distances) associated with those routes. The routing table contains information about the topology of the network immediately around it. The construction of routing tables is the primary goal of routing protocols. Static routes are entries made in a routing table by non-automatic means and which are fixed rather than being the result of some network topology "discovery" procedure. 

How To Check windows Routing Table:

  • Run as Administrator CMD
  • Then Type Route Print 

  •  Now Add A Route Manually 
  •  route ADD destination_network MASK subnet_mask  gateway_ip metric_cost
  • route -p add 101.50.64.229 mask 255.255.255.255 172.21.48.1
  • -p if you’re just adding one or two static routes that you don’t expect to change often, you can instead just add the -p option to the command to make the route persistent. A persistent route stays in place even when Windows starts up. Using the same command we used earlier, you could make that route persistent with the following modification

 
  • What is the Scenario in our case we add a router with 101.50.64.229 mask 255.255.255.255 172.21.48.1
Explanation :In our case as we configure a route with a local PC Gateway 172.21.48.1 and subnet mask 255.255.255.255 will be only router traffic to 101.50.64.224 no other traffic will be router from this Gateway because we have an other Default router with 0.0.0.0 0.0.0.0 with Gateway 172.16.0.1.
What ever traffic come from this network 172.21.48.1 255.255.255.255 will be router to 101.50.64.224
there is no need to configure Multi Gateway on NIC Just configure IP and subnet mask as we did.
  • 172.21.48.3  is NIC IP what ever traffic in or out will b use the local gateway 172.21.48.1 and router traffic only to 101.50.64.224 and there is no Multi gateway conflict for traffic.

Remove a Static Route from Windows:

  •  route delete destination_network
  •  route delete 101.50.64.229


Friday, 4 January 2019

Sunday, 18 November 2018

November 18, 2018

Install Snipe-it to windows 7 with wamp

Install Snipe-it to windows 7 with wamp

1st of all downloads mention blew item

  • Download install visual c++ redistributable for visual studio 2012 update 4. Install both x86 and x64 version download
  
After installation of these package configure these settings in wamp 

3. Set up your database

  • Open your MySQL console:

Press enter for default password, or enter your master MySQL password if you changed it to something else previously.
 Run the following commands to create and verify database:
  • create database snipeit;
  • show databases;
Create a database user and grant access to your new snipeit database:
  • create user snipe_user;
  • grant all on snipeit.* to 'snipe_user'@'localhost' identified by 'password123';
(Change password123 in the example above to something more secure, please.)

1. Install Composer (composer.exe)

 Browse to C:\wamp\bin\php\php7.0.10\php.exe. 

Extract and configure Snipe-IT and run composer

Download and exact Snipe-IT to c:\wamp\www\snipe-it.
 Edit .env.example
Save your edited env.example as .env
 Open command prompt then change directory to c:\wamp\www\snipe-it\. Then run:
  • composer install --no-dev --prefer-source
     
    After this command it will take some time to download packages  
 

Generate your app key

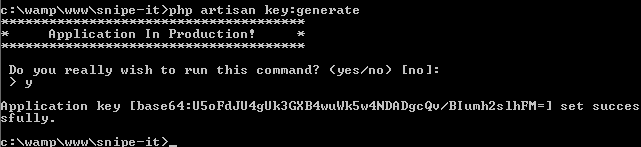
  • php artisan key:generate
 
  This will update the app key in your .env file:

 Be sure to keep this app key in a safe place, as it is necessary for decrypting any encrypted fields you might add.

http://localhost/snipe-it/public/ 


Finnaly done

Monday, 3 September 2018

September 03, 2018

Site To Site VPN with Softether VPN Server Manager

Site To Site VPN with Softether VPN Server Manager

  1. Download and install Softether VPN Server Manager on PC by Clicking link Download SoftEther VPN alternate link Download SoftEther VPN from CNET Download.com
  2. After Installation look like that
     click on local host and configure new Password for the Hub settings.
    After configuring password VPN Configuration Wizard Start now configure it 


     just click next then appear on next L2tp settings configure the default then click net and exit when the VPNAzure configuration appear like this 


    Enable VPN Azure click on Change hostname to configure your own DDNS Hostname then exit.
    click on create users then new and configure username and password and finish


    now finally enable Secure Nat Click on Mange virtual hub then click on virtual nat and virtual DHCP and then Enable Secure Nat and exit

    Now Configure VPN on Client Machine


    Type of VPN should be SSTP
    Before you connect VPN Open CMD and type the command netstat -r 


    Now Connect VPN and type again command in CMD netstar -r

     Above are the Remote network server address now you can access remote network

Thursday, 2 August 2018

August 02, 2018

Backup with Acronis True Image via PXE boot

Backup with Acronis True image via PXE boot

  • 1st Install Acronis True Image
Import WMI file in to pxe server

Now Boot with PXE


Click on backup select My disk or File and Folders
configure Target path via storage or FTP and done